Deep Learning - Training Korean TTS using Tacotron in Windows OS
딥러닝 음성 합성 / 보코더 github 모음
https://chldkato.tistory.com/7
윈도우에서 Tacotron 한국어 TTS 학습하기
https://chldkato.tistory.com/141
https://github.com/chldkato/Tacotron-Korean
https://github.com/chldkato/Tacotron-Korean-Tensorflow2
1. 한국어 음성 데이터 다운로드
https://www.kaggle.com/bryanpark/korean-single-speaker-speech-dataset
2. ~/Tacotron-Korean-Tensorflow2에 학습 데이터 준비
Tacotron-Korean-Tensorflow2
  |- kss
      |- 1
      |- 2
      |- 3
      |- 4
      |- transcript.v.1.x.txt
3. Preprocess- List installed python packages
> python preprocess.py
--> ModuleNotFoundError: No module named 'librosa'
> pip install librosa
--> ModuleNotFoundError: No module named 'jamo'(Python-jamo is a Python Hangul syllable decomposition and synthesis library for working with Hangul characters and jamo.)> pip install jamo> pip list
> python preprocess.py 실행 후, data폴더에 학습에 필요한 파일들이 생성됩니
text_len은 dynamic rnn에 들어가는 각 텍스트의 길이, mel_len은 zero padding 최소화를 위한 각 멜스펙의 길이입니다
text, mel, spec는 각각 텍스트, 멜스펙트로그램, 스펙트로그램이고 dec는 디코더 입력이 되는 멜스펙입니다
4. Traintrain1.py - train2.py 순으로 실행하면 바로 학습이 진행됩니다
train1은 embedding 부터 디코더까지, train2는 post CBHG입니다
>python train1.py
>python train2.py
실행 후에는 checkpoint 폴더에 학습한 모델이 각각 저장되고 attention alignment 그래프가 저장됩니다
tensorflow v2의 경우 저장된 모델이 있으면 가장 최근의 모델을 불러와서 다시 학습합니다
tensorflow v1에서 이전에 학습한 모델을 불러와서 다시 학습하려면 아래와 같이 실행하면 됩니다
>python train1.py --step 100000
>python train2.py --step 100000
본인이 학습한 모델에 맞게 숫자를 수정하면 됩니다
3. Synthesize
test1.py를 열어서 sentences에 합성할 문장을 정해줍니다
불러올 모델을 지정하여 test1.py - test2.py 순으로 실행하면 됩니다
tensorflow v2는 학습 때와 마찬가지로 최근 모델을 불러오기 때문에 python test1.py만 입력하면 됩니다
>python test1.py --step 100000
>python test2.py --step 100000
tensorflow v1은 재학습과 마찬가지로 숫자는 본인에 맞게 수정하면 됩니다
output 폴더에 alignment 그래프와 wav 파일이 생성됩니다
아래는 학습할 때 attention alignment 그래프입니다
===============================About Github
===============================
…or create a new repository on the command line
echo "# test" >> README.md git init git add README.md git commit -m "first commit" git branch -M main git remote add origin https://github.com/merits/test.git git push -u origin main…or push an existing repository from the command line
git remote add origin https://github.com/merits/test.git git branch -M main git push -u origin main…or import code from another repository
You can initialize this repository with code from a Subversion, Mercurial, or TFS project.
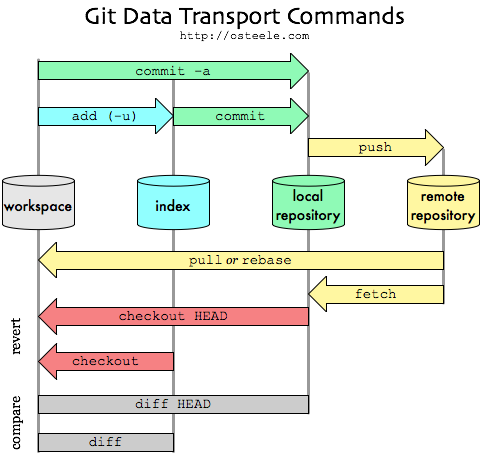
컴퓨터에서 만든 파일의 위피 : 자신의 컴퓨터 디렉토리(작업 디렉토리)
이 파일을 깃에 전달하기 위해서는 준비 : (add - 스테이징 영역)
준비가 된 파일들을 전달 : (commit - 로컬저장소)
커밋한 파일들을 원격저장소로 업로드 : (push - 원격저장소)
나의 파일을 원격 저장소 ( 깃허브에서 생성한 저장소 ) 로 업로드 하기 위해서는 이러한 절차를 거친다.


댓글
댓글 쓰기